This is a tutorial on how to knit (by hand) a pair of those super cute newborn pants that are all the rage these days.
.png)
I started to put this together for a friend and decided that there might just be a few other photographers, or others out there, who might find it useful. So, I decided to share it!
*****
First off, a couple of disclaimers… This post is not for someone who has no idea how to knit. You have to know a few basic things in order to follow along. I’ll make a list of those things below with some links to help you out. Secondly, before you embark on this project I have to be honest with you. This will never be faster than clicking “buy” on your favorite vendor’s site. 🙂 In fact, depending on what kind of yarn you use, it might not even be cheaper. It certainly can be, but if you’re like me, you have an uncanny knack of finding the most expensive thing in the store, even in a yarn store! All of that aside, what I can tell you is that if you can knit a stitch or two, you can make these. Making things for yourself gives you 100% creative control and it can be a lot of fun.
*****
In order to complete this tutorial you need to know the 4 things listed below. I have linked each of these things to a YouTube video (I didn’t make these videos) because I think that watching it is by far the easiest way to learn, provided you don’t have someone to show you. Keep in mind that there are often multiple ways to approach each of these things, these are just the first videos that I found to try to point you in the right direction. If you know how to do these things, skip ahead. If not, take a look at the videos and when you’ve figured them out, come on back to get started. (If you find a better video, let me know and I’ll switch out the link!)
Ok, now that we’ve got all of that out of the way, let’s get started. There are lots of different patterns that you can use when you’re knitting, but to keep things simple we’re going to knit these pants with a stockinette stitch. That’s knit across, pearl back. We’ll also use a couple of pearl rows as a cuff on the pants and the waist for fun. There are numerous ways to make things, this is just the way I decided to do it. If you find a different method that works better for you, then by all means go with it!
The first thing you need to do is get your supplies. You’ll need yarn, knitting needles, a big sewing/knitting needle, and scissors.
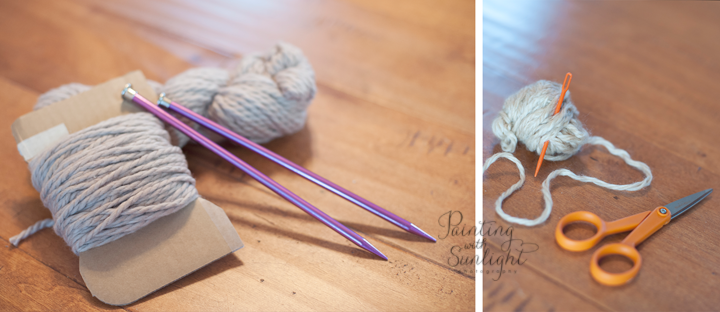
When choosing yarn keep in mind that the thicker the yarn, the faster it will knit. When you’re starting out, it’s a nice confidence booster to choose a bulky yarn because you see the result of your work fairly quickly. However, really large needles are tough to work with, so don’t go too big! You read the yarn label to find out what needle you should be using. The yarn that I’m showing here is super bulky in weight and requires between 11 – 15 US size needles. I choose to use an 11 to make a smaller stitch than the 15 would yield. Nice yarn comes in a Skein and may not be wound for knitting. You can see the skein of my yarn sitting behind my needles in the first image. Most knitting stores will wind it for you, but I happened to be in the store with my 3 kids so I needed to get out of there as fast as possible. Three kids under 5 in a knitting store is about as close to a bull in a china shop as you can get aside from taking said children into a china shop. So when I got home I had to wind the yarn. Without a yarn winder, what I did was I took a piece of cardboard, notched the center and wound the yarn around to create a nice neat ball to work with. You can loop a skein of yarn around the top of a chair while you wind it to avoid a massive mess of tangled yarn! The rest of the supplies come later, so we’ll talk about them later.
There is one more thing you need to do before you start on your knitting project. If you’ve never used the yarn before, you should probably knit a test swatch. When you know how to knit, you can knit anything that you can draw, in any yarn, however you have to size it first. The yarn label will tell you what they expect the stitch sizing to be but everyone knits a differently, especially beginners. You need to find out how many stitches per inch your yarn will knit, so you know how many stitches to cast on for your pants.
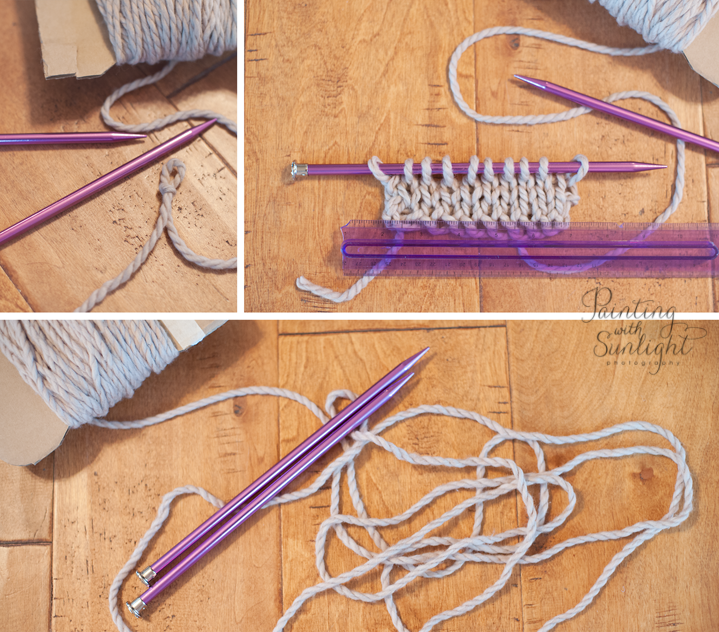
Make a slip knot and cast on about 10 stitches and knit a few rows. Once you’ve knit enough to see the pattern and your work is settled below the needle in a natural fashion, you can measure how many of your stitches it took to make 1″.
If you try to measure your knitting up close to the needles you won’t get an accurate size because the needle is holding the stitch. Write down your stitch to inch ratio and then you can unravel all of your stitching.
If you’re planning to use the yarn again, you may want to save your swatch, or your notation. The yarn I’m using here was expensive, so I don’t want to waste it on a test swatch!
I have about 1.5 stitches per inch here. (Do you like my fancy broken ruler! 🙂 )
To make your pants you want to make the leg portion between 3.5 and 4″ wide at the bottom and about 5.5″ long. I decided to go a little wider on these and use 8 stitches for the width of my pant leg. Some of the width will be lost when I connect the front and back of the pants and I don’t mind if they are a little wider so they are easier to put onto the baby. When you’re sizing, you have to use your judgement based on the desired look and stretch of the garment.
Let’s get started on the actual pants! I want to create a cuff on these little pants so after I finish casting on, I’m going to use a pearl stitch across the first row. Here are your steps:
- Cast on (I used 8 stitches)
- Pearl row 1
- Knit row 2
- Knit row 3
- Pearl row 4
- repeat steps 4 and 5 until you’ve reached 5 or 5.5″ or your desired pant leg length. (Knit across, pearl back is your stockinette stitch) As soon as you’ve knit for a few rows in your stockinette stitch you’ll see your cuff at the bottom. The cuff (steps 2 and 3 above) is optional. If you cast on and just start knitting your stockinette stitch you can make the pants without the cuff.
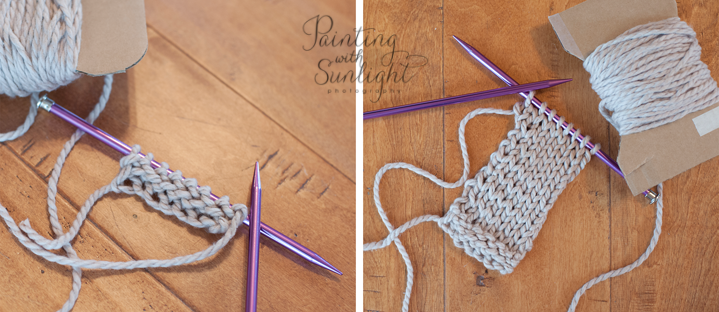
- Once you’ve reached your desired length you need to place this leg on a stitch holder or loop it through a piece of yarn to hold the stitches in place while we work on the other leg. I’m showing a stitch holder below, but to use yarn, just grab that big plastic needle, that I said we’d talk about later, and run a piece of yarn through the stitches. Once your yarn, or stitch holder is through your stitches, pull the knitting needle out and set this first leg to the side. You’ll need to clip your yarn and disconnect this pant leg from your ball of yarn to start on the next leg. Leave a tail long enough that it won’t unravel and will be easy to weave in later.
- Go back up and repeat steps 1-6 for your second pant leg
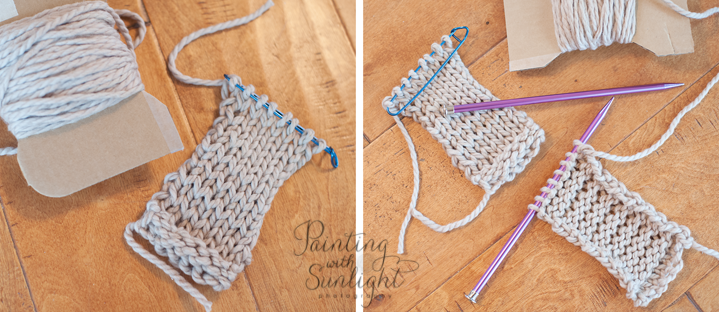
Now we have two legs completed, we need to join them together and knit the top of the pants.
- With the wrong side facing you, create a simple loop with your yarn and loop it over the end of the needle (you are adding stitches for the crotch)
- Repeat this, adding two more loops. (With my yarn size, I add 3 loop stitches for the crotch. You want about 1.5″, so adjust the number of added stitches accordingly based on your stitch to inch ratio.)
- Now slide the other leg (from your stitch holder or yarn) onto the other needle (the one you just added stitches to) Make sure you match the sides so your right or wrong sides are facing the same way.
- Cut the yarn hanging off the added stitches with enough of a tail to weave in later, about 6″ should do it. (You may need to tie the tails together to make it easier to knit across. That is fine, just make sure it’s loose enough that you can untie them later and weave them in nicely when you get to the finishing step.)
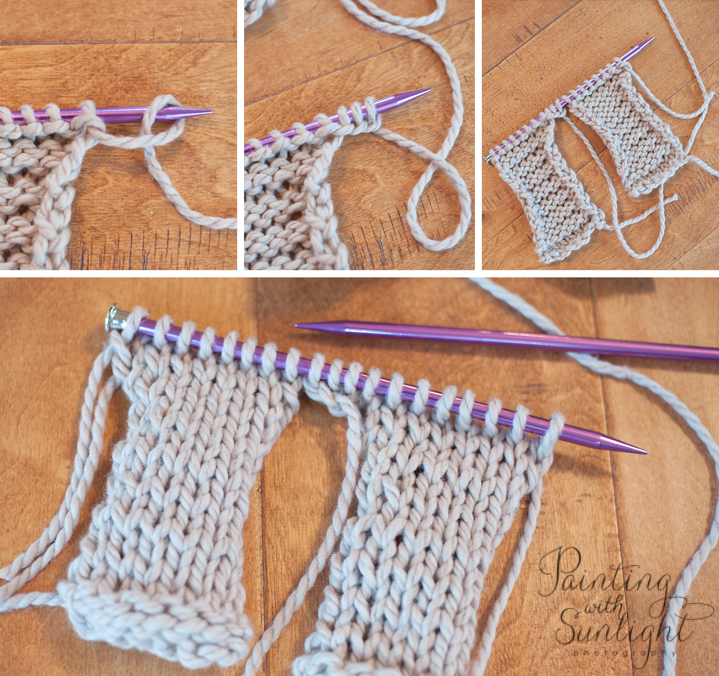
- Now pearl across your new row. (If you added your legs with the wrong side facing you, you’re pearling here, if you switched it and added them with the right side facing then it would be a knit stitch. Just make sure that your first row looks seamless, as in the picture above and you’ll know you’re doing it correctly.)
- Continue knitting across, pearling back (your stockinette stitch) until the main section of your pants is 5″ from the crotch. (If you are leaving out the ribbed cuffs on the pant legs and waist, then continue until you’ve reached about 6″)
- Once you’ve reached your desired length it’s time to do the waist cuff. Switch your stitch. If you’re about to knit across, switch to a pearl stitch, if you were about to pearl across, switch to a knit stitch.
- You can do as many ribbing rows as you’d like, just continue with the stitch that you switched to. I don’t want a thick waist ribbing and the cast off step will add another row of stitching, so I only did one row of the reverse stitch for the ribbing.
- Now you need to cast off. When you cast off make sure you cast off with the stitch you want your ribbing to show. For me this was a pearl stitch. This completes one full side of your pants.
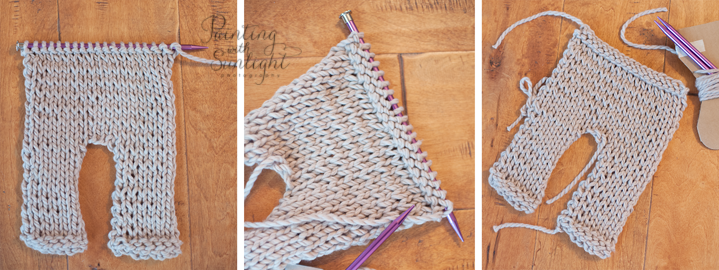
- Repeat steps 1-17 to make a second side of the pants.
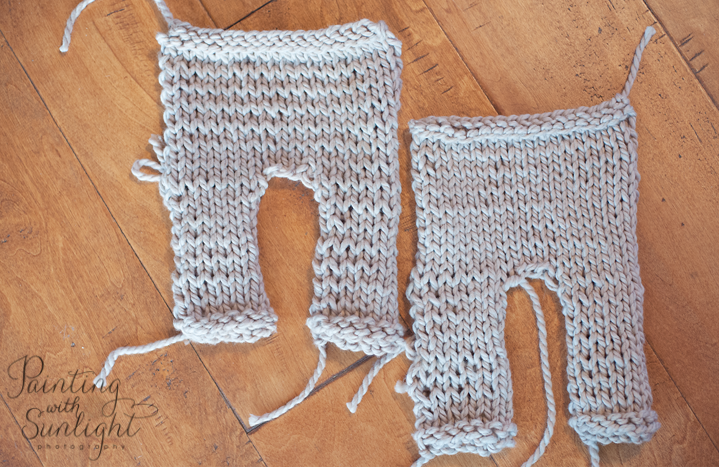
- Now we need to sew the two sides together. Place the right sides together you will start along one of the side seams.
- You will use your big needle and yarn for this step. You can use the same yarn that you’re knitting with, or a different yarn that is the same color. This is useful if you’re knitting with a super bulky yarn like I am and you want a thinner yarn to finish with. In order to show the finishing step I used a blue yarn in the images below and then switched to the correct color to actually finish the pants. Thread your needle with your yarn and stitch the sides together. (Finishing is arguably the most important step. Take the time to do it right, after all, you just spent all that time knitting! Be careful to tie off ends nicely and weave in all loose ends.)
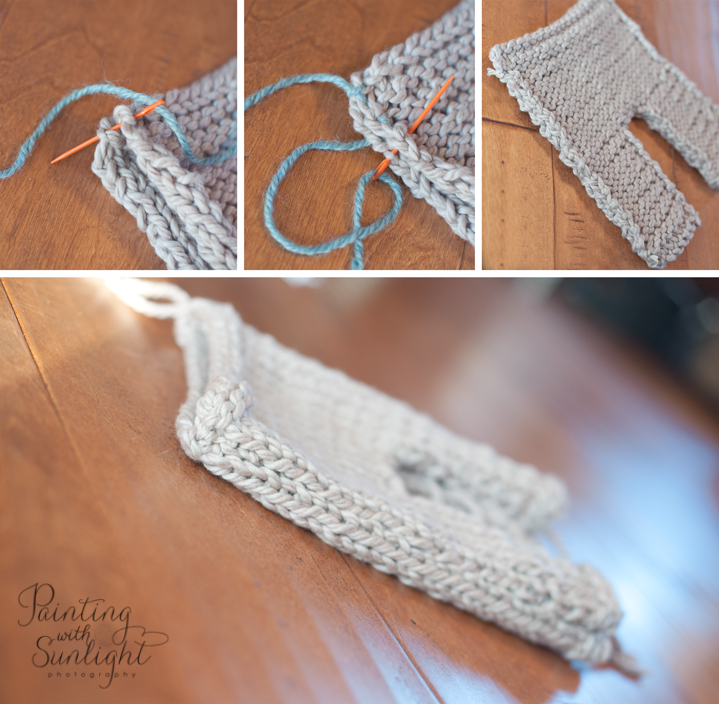
- You’ve finished your pants!
And now comes the fun part… dressing them up! Knit yourself some little hats, add ties and ribbons, the options are endless!
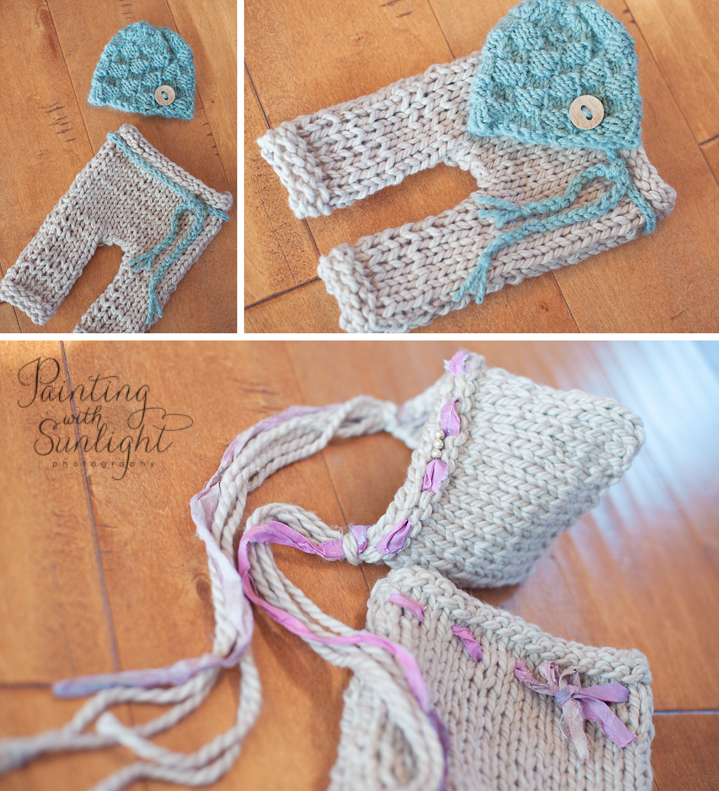
The best part about making your own newborn photography props is that you can make a neutral base product that can be dressed up in many different ways. I choose this oatmeal color for my pants because of all the different trim options that I had in mind.
And that’s it ladies and gentlemen! Pants completed. If you’re wondering how long it will take to make a pair of newborn pants like this, I’m sorry but I can’t really answer that question. Everyone knits at a different pace. If you’re an experience knitter it wouldn’t take very long at all, but if you are reading my tutorial, that’s probably not you. The first time you do anything it always takes longer, so hang in there! And while I can’t tell you how long the project will take you, I can tell you for sure that it definitely takes longer to write about making these newborn pants than it takes me to make them! 🙂
Good luck!


Thank you so much for this thorough post! I am a newbie knitter and never thought I would be able to knit anything other than a pot holder! Your directions and tips were so clear and easy to follow. I am 39 weeks pregnant and cannot wait to put these little pants on my son. Thank you, again!!!!